Difference between revisions of "Sengoku"
| Line 2: | Line 2: | ||
[http://www.geocities.com/nairenvorbeck/files Homepage:] | [http://www.geocities.com/nairenvorbeck/files Homepage:] | ||
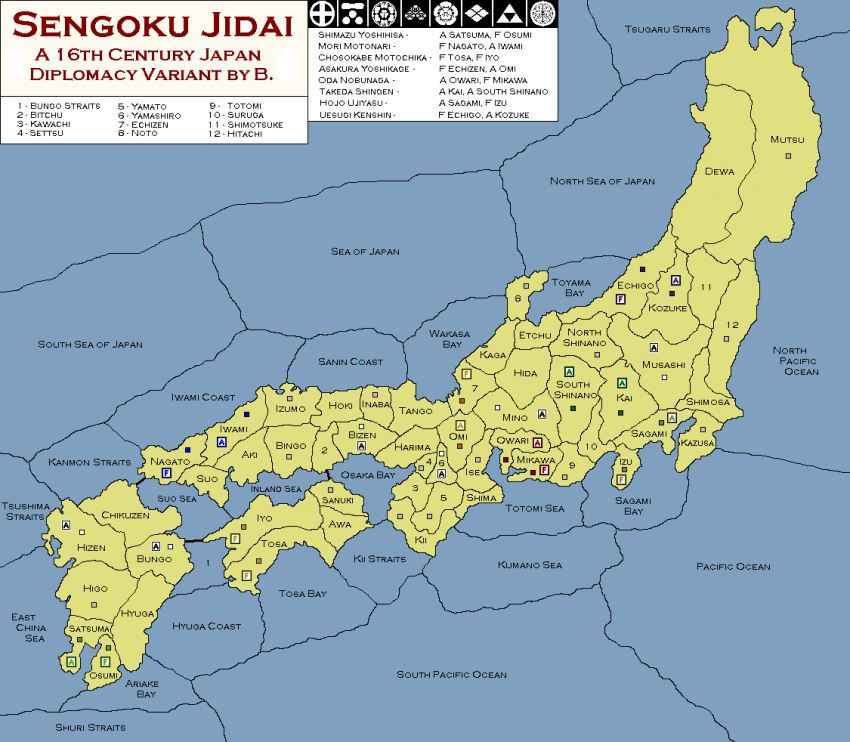
| − | [[Image: | + | [[Image:SengokuRev5.PNG|center|850px]] |
=== Variant Description: === | === Variant Description: === | ||
| Line 50: | Line 50: | ||
One of the last daimyo to fall before the mighty army of Toyotomi Hideyoshi, Oda Nobunaga's successor. If left uncontested, the Hojo will quickly rise to dominate the Kanto region of Japan. The potential for rapid initial gains can be easily negated by Takeda aggression however, and Oda poses a serious obstacle to southern conquests. If trust can be built, alliance with Takeda is potentially the most profitable. | One of the last daimyo to fall before the mighty army of Toyotomi Hideyoshi, Oda Nobunaga's successor. If left uncontested, the Hojo will quickly rise to dominate the Kanto region of Japan. The potential for rapid initial gains can be easily negated by Takeda aggression however, and Oda poses a serious obstacle to southern conquests. If trust can be built, alliance with Takeda is potentially the most profitable. | ||
| − | [[Image: | + | [[Image:SengokuRev5Base.PNG|thumb|450px]] |
[[Category:Variant]] | [[Category:Variant]] | ||
Revision as of 14:27, 28 May 2009
Sengoku Jidai Variant Rules, Version 5.0.
Homepage:
Variant Description:
The Sengoku Jidai Variant is a historical transplant of Hasbro/Avalon Hill's Diplomacy to medieval Japan. The Sengoku Jidai Variant conforms to the standard rules of Hasbro/Avalon Hill's Diplomacy in most every way, with the few exceptions listed below. The standard rules are NOT copied here, and all players of the Sengoku Jidai Variant are assumed to own or expected to purchase the Rules of Diplomacy (or better yet, the full game) through Hasbro/AH, as I did.
Turns move from Spring to Fall just like standard Diplomacy, and the first turn is Spring 1570. Abbreviations are often not at all what you might expect them to be because of the significant number of provinces that share the same first three letters (i.e. Echigo, Echizen, Shimosa, Shimotsuke, Izumo, Izu, Yamashiro, Yamato, and all those that share their name with a body of water e.g. Totomi, Totomi Sea, Tosa, Tosa Bay etc. etc.) Be sure to check the names feature on Realpolitik.
Units may be built on any vacant supply center that you have held for a fall. (i.e. all SCs controlled by players are considered their "home supply centers" for the purpose of building units - Chaos Builds.) Bitchu and Sanuki are considered land contiguous, as are Nagato and Chikuzen, and Iyo and Bungo, though they appear separated by water on the map. Both Armies and Fleets may cross from one of these territories directly to the other. Movement by fleets through the surrounding sea zones is unaffected. The three dark borders indicate these "bridges" on the map.
In addition to the 8 players of this variant, there are neutral territories, represented by White on the map. Each neutral territory is occupied by a neutral army that never does anything but hold. These armies may be supported by other players. They are disbanded immediately if dislodged, but rebuilt at the end of the year if the territory is not occupied. Treat neutral units like armies in Civil Disorder. Once occupied, the territory becomes a standard SC, and never reverts to a neutral again.
Victory is declared when one Daimyo has control of 15 SCs, or all other players concede defeat. If the players agree to a draw, the GM chooses a winner (Shogun). The criteria for this determination are as follows, in order of precedence: the player with the most SCs at the time the draw is agreed to, the player with the highest average count of SCs per year, or at the GM's sole discretion if there is no clear leader per the previous two conditions. There can only be one Shogun. Have fun and welcome to 16th Century Japan!
Commentary:
- Shimazu Yoshihia
One of the most ancient and well-established families among the daimyo of the Sengoku Jidai. Benefits from a defensible corner position on the map, but can be slow to develop. Conquest of the neutrals in Bungo (Otomo Sorin) and Hizen (Ryuzoji Takanobu) is a common objective. A full attack on Hizen by Mori coupled with Chosokabe support of neutral Bungo (Otomo Sorin) spells disaster for the Shimazu.
- Mori Motonari
An upstart daimyo, formerly a retainer to his slain master of the Ouchi family. Inherited his former master's holdings and developed them to become the strongest opponent of Nobunaga's successor, Toyotomi Hideyoshi. Must avoid cooperation between Shimazu and Asakura at all costs. Surrounded by neutrals, Mori does better to support some of them as buffers, rather than picking them off. Vulnerable to attack by Shimazu and Asakura, and to a lesser extent, Chosokabe.
- Chosokabe Motochika
Dominant on his home island of Shikoku, Chosokabe struggles to build influence on Honshu or Kyushu. Development of ground forces is a top priority. Benefits most from either the destruction of Shimazu, or a solid alliance with him, although the division of Mori spoils often tends to favor Shimazu. Tensions over the vulnerable Suo Sea and wealthy Bingo should not preclude cooperation with Mori.
- Asakura Yoshikage
Surrounded by neutral armies and resource-poor lands, Asakura must choose early to move decisively either north or south along the coast of Honshu. Splitting attentions between Mori and Uesugi leads to an early downfall. Alliance with Oda is common, but more often, the two simply agree to leave one another alone rather than coordinate attacks. Uesugi can pose a serious challenge if Takeda allows him to grow unchecked. Takeda proves to be a worthy ally, especially in an alliance against Uesugi or Oda.
- Oda Nobunaga
The first of the three great unifiers of Japan, Oda Nobunaga rose from humble beginnings in the resource-poor province of Owari to dominate the heartland of Honshu. He was the daimyo that unseated the Ashikaga Emperor in Kyoto, Yamashiro province. Like Asakura, Oda must move decisively in one direction early in the game to succeed, while using diplomacy to secure the other front. A negotiated peace with Asakura, Takeda, or Hojo usually determines the focus of Oda's attacks.
- Takeda Shingen
Perhaps the most beloved and famous of the Sengoku daimyo, Takeda Shingen led the famed mounted samurai of Kai, whose superior tactics were dominant for many years over infantry wielding the European arquebus. The frequent opponent of Uesugi, Hojo, and Oda historically, Takeda's hopes for victory lie in early aggression to restrain Uesugi and/or Hojo from claiming their otherwise easy builds. An early spoiler attack from Takeda will crush the hopes of the other northern powers.
- Uesugi Kenshin
Historically, the downfall of Uesugi was that his strength was spent on the battlefields of Kawanakajima (North Shinano) rather than focused on the shogunate. His many battles with Takeda were the undoing of both great daimyo, and so it is in this game. A negotiated settlement with Takeda is priceless, albeit difficult to achieve. Cooperation with Hojo yields significant benefit, although the two powers can do little to aid each other initially - excepting at the expense of the neutral Satomi in Musashi province.
- Hojo Ujiyasu
One of the last daimyo to fall before the mighty army of Toyotomi Hideyoshi, Oda Nobunaga's successor. If left uncontested, the Hojo will quickly rise to dominate the Kanto region of Japan. The potential for rapid initial gains can be easily negated by Takeda aggression however, and Oda poses a serious obstacle to southern conquests. If trust can be built, alliance with Takeda is potentially the most profitable.

